The Adobe Photoshop Creative Cloud has lots of functions, and it is the most advanced image editor designed for photographers, professional designers, and artists. With the Adobe Photoshop Creative Cloud, users can design websites, banners, mobile apps, posters, icons, and logos. Its user-friendly intuitive tools and templates make it quite easy for users to carry out their work.
Photoshop CC enables users to design and enhance illustrations, 3D artworks, and paintings. It provides unique effects and patterns as well as advanced brushes, which enable users to design and customize digital masterpieces. There are many unique tools featured in the Adobe Photoshop CC, these tools include brush smoke smoothing, paint symmetry, brush management, quick share menu, lightroom photo access, among others.
User Reviews
Music scene releases
Hello,
Music download private server https://0daymusic.org MP3, FLAC, LIVESETS, Music Videos.
Team 0day
Aloha, wrote about price for reseller
Здравейте, исках да знам цената ви.
Promotion site
Hello dear friend, I would like to offer placement of your link (or links) on different platforms of the internet such as: forums, blogs, comments and much more. . .
Increase your Visibility Boost Your Seo Rank – Get Organic Traffic From Google. Ranking in Google isn’t hard. All you need is a healthy number of backlinks from referring domains that have authority and trust in Google’s eyes.
This Backlinks Service Benefits:
1. Easily get Google rankings
2. Get a lot of traffic from Google
3. You can earn from the website in different ways
4. Increase Domain Authority (DA)
Quality guaranteed !
PRICE – 10$
WebSite – http://traffic-for-your.site/
XBOX игры купить разнообразные игры: XBOX Цифровые версии игр
Купить лицензионные игры +на xbox стать ГАЙМЕРОМ + https://ggsel.net/catalog/product/3074508
Удобная оплата через Enot(11 способов оплаты)-оплта картой Perfect money а так же через криптовалюту
ИНТЕРНЕТ МАГАЗИН ЦИФРОВЫХ ТОВАРОВ https://bysel.ru
Акканты xbox-новые игры https://ggsel.net/catalog/product/3098640
xbox купить игру лицензиюhttps://ggsel.net/catalog/product/2920504
Автопополнение моментально Steam(выгодный курс) https://ggsel.net/catalog/product/3589474
ключи игр xbox +one купитьhttps://ggsel.net/catalog/product/3051395
Автопополнение моментально Steam(выгодный курс) https://digiseller.market/asp2/pay_options.asp?id_d=3582748
купить аккаунт steamhttps://bysel.ru/goods/?activation=steam
Купить аккаунт ?Аккаунт CSGO 2000+ часовПолный доступhttps://ggsel.net/catalog/product/3937225
Купить аренда аккаунта DOTA 2 ?? 2000 часов | ОНЛАЙНhttps://ggsel.net/catalog/product/3937212
Купить аккаунт ?Skype аккаунт с балансом 2-5 usd + ПОЧТА ??https://ggsel.net/catalog/product/3933881
Купить аккаунт ??ChatGPT (Chat GPT) ?? аккаунт ?? + VPN ??подарокhttps://ggsel.net/catalog/product/3225209
Купить ключ Windows 10/11 Pro 32/64 bit Лицензияhttps://ggsel.net/catalog/product/3221892
Турецкий аккаунт PSN4psn5https://ggsel.net/catalog/product/3473640
xbox gift card(покупка игр в иностранном аккаунте)https://ggsel.net/catalog/product/2974252
Steam Turkey TL Gift Card Code( FOR TURKEY ACCOUN)(стим игры дешевле чем в русском аккаунте)https://ggsel.net/catalog/product/3589468
Новый Стим аккаунт ( Турция/Полный доступ) PayPaLhttps://ggsel.net/catalog/product/2985407
League Of Legends 850 LoL RP – ТУРЦИЯ https://ggsel.net/catalog/product/3012399
Valorant 740 VP or 1050 Riot Points – ТОЛЬКО ТУРЦИЯ https://ggsel.net/catalog/product/3331571
PUBG Mobile 325 UC Unknown Cashhttps://ggsel.net/catalog/product/3430858
Playstation Network (PSN) 10$(USA)https://ggsel.net/catalog/product/3466036
iTUNES GIFT CARD – (TURKEY/USD) https://ggsel.net/catalog/product/3116494
Adguard Premium 1ПК(лучший блокировщик рекламы. можно отключить доступ к порно на поисковиках) https://ggsel.net/catalog/product/3046307
Netflix Турция Подарочный код TL??(VPN постоянно)дешевле чем в других аккаунтах https://ggsel.net/catalog/product/2911572
RAZER GOLD GIFT CARD 5$ (USD) Global Pin https://ggsel.net/catalog/product/3051315
Купить карта оплаты Blizzard Gift Card 5$ USDhttps://ggsel.net/catalog/product/3025661
Amazon gift card usd https://ggsel.net/catalog/product/3203865
Nintendo+https://ggsel.net/catalog/product/3296413
НЕДОРОГИЕ игры XBOX ONE
fifa 20 xbox ukhttps://ggsel.net/catalog/product/2961184
xbox купить игру лицензиюhttps://bysel.ru/goods/dlc-ultimate-komplekt-mortal-kombat-11-xbox??klyuch/
Автопополнение моментально Steam(вы зачисляете свои средства на свой стим аккаунт,пишите логин) https://digiseller.market/asp2/pay_options.asp?id_d=3582748
ключи игр xbox +one купитьhttps://ggsel.net/catalog/product/3098640
ключи игр xbox +one купитьhttps://ggsel.net/catalog/product/2957673
ключи игр xbox +one купитьhttps://ggsel.net/catalog/product/3221060
roblox gift card купить+https://bysel.ru/goods/??-blizzard-gift-card-??-10-usa-bez-komissii/
Недорогой качественный хостинг от 85р. https://webhost1.ru/?r=133178
купить билетhttps://gagarina.com на концерт Полина Гагарина Навсегда(в живую посмотреть послушать певицу c необыкновенным особенным мелодичным голосом)
Если Нет денег купить что нибудь,устрайивайся на работу и обращайся в HOME BANKE, если хочешь купить машину, приходи в банк HOME BANKE https://hcrd.ru/fTa9a8
Хочешь добиться чего нибудь, получи кредит в Альфа Банке https://clck.ru/33Pzfy октрывай свой бизнес, работай на себя(напиши бизнес план)получи дебетную карту https://clck.ru/33Pzd8
Недорогой хостинг от 85р, при переносе с другого домена 2 месяца бесплатноhttps://webhost1.ru/?r=133178
Hi i write about prices
Sveiki, aš norėjau sužinoti jūsų kainą.
**Official website : http://www.adobe.com/Photoshop
Getting the Adobe Photoshop CC (Creative Cloud)
Adobe Photoshop Creative Cloud requires a subscription; the Photography plan costs $9.99 monthly. You can subscribe to the whole collection of apps at $52.99; this offers many tools to improve your creativity. Creative Cloud Single App costs $20.99 per month
System Requirements
- 4 GB of RAM
- Microsoft Windows 7 with Service Pack 1
- 6GHz or faster processor with SSE2 support
- 1280 X 800 display resolution
- DVD-ROM drive
- Internet connection needed for content download and product activation
- Microsoft DirectX9 or 10 compatible display driver
- 4 GB of RAM
- 5 GB hard disk space for applications installation
- 5 GB to download all optional content
- DVD-ROM drive
- macOS v10.12 to v10.14
- DVD-ROM drive
How to Download and Set up the Adobe Photoshop CC
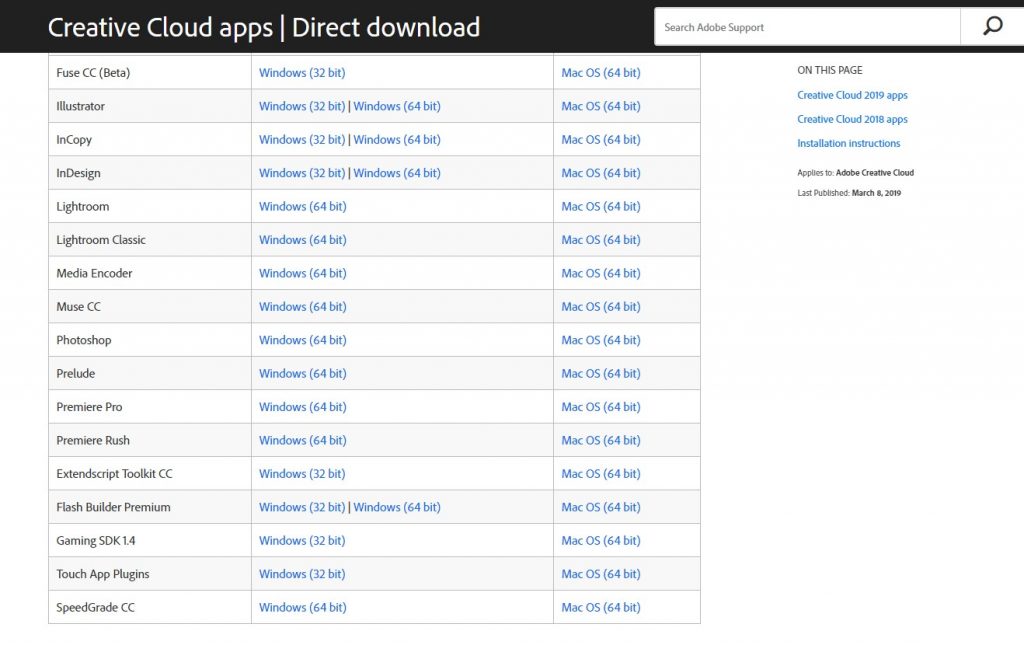
Step 1: Visit https://helpx.adobe.com/download-install/kb/creative-cloud-apps-download.html website, then download the software and select the latest version at the top of the screen. Select the right operating system and then click the download button and then save it at your preferred location.
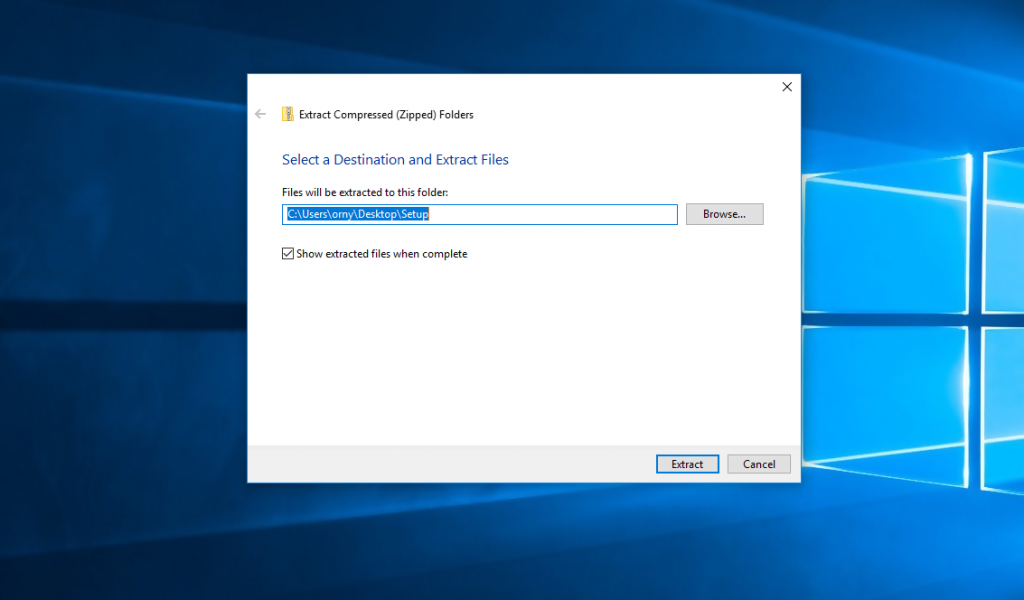
 Step 2: Unzip the folder after the download
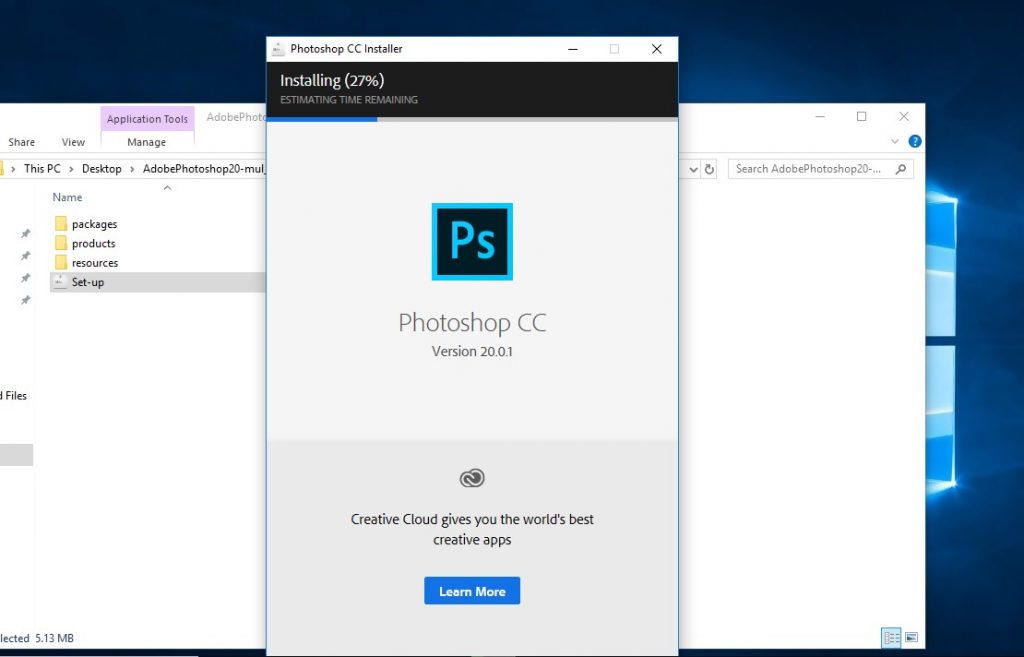
Step 3: Go to the folder and select the setup file, and run as administrator

Step 4: Click on setup and then the software starts installing
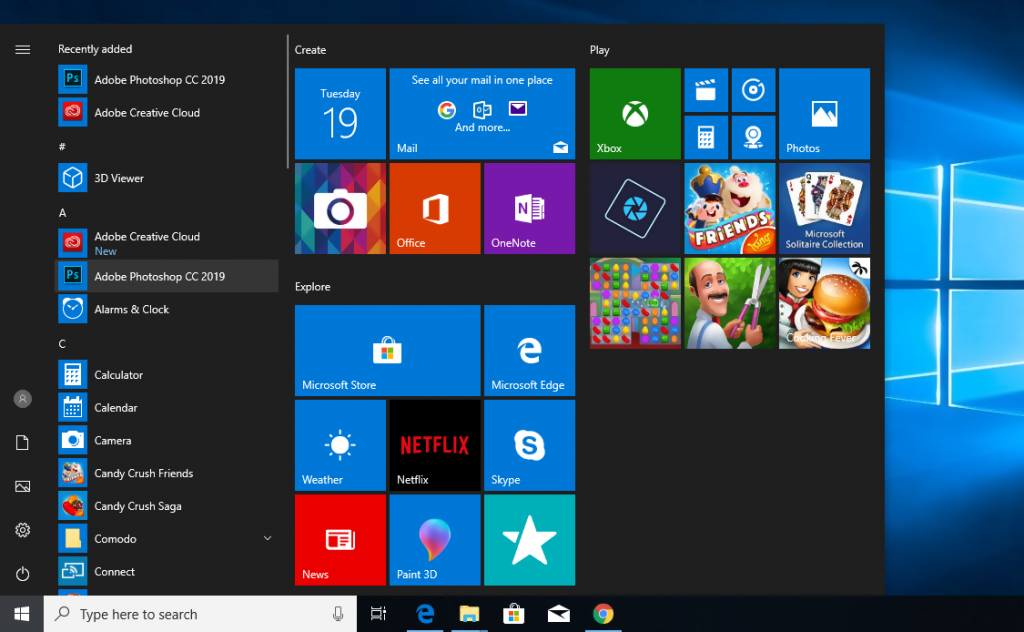
Step 5: Go to the menu and click on Photoshop to open
Pros and Cons of Adobe Photoshop CC
The benefits of this Photoshop have made it the best choice for graphic designers, artists, and photographers. Below are the pros and cons of Creative Cloud.
Pros:
- It has many design tools to utilize
- The interface is very easy to understand
- It is very useful for photo manipulation or corrections
- Videos can be edited with ease
- It helps to protect specific parts of the user’s artworks or images.
- Users can share their projects and artworks to anyone through the app
- It provides digital asset management platforms and integration with different project collaboration
- With the existence of the integrated stock library, users can have more control over the creative process
- Users can have access to stock photos through Adobe Stock
Cons:
- It requires a subscription fee
- This software can be so overwhelming for users who need simple photo editing
- Some tools do not display progress bars
- Absence of presets or one-click effects
The Photoshop Interface
The Photoshop interface is becoming more customizable over time. Users can choose from various targeted workspace layouts such as Graphic and Web, Photography, 3D and Painting.
-
The Document Window
The image is displayed on the Document Window; the document window is the large space at the center of the interface where the editing of the image takes place. The canvas is the exact area where the image is made visible.
-
The Document Tab
The document tab is located at the top of the document window. The document name, file type as well as its present zoom level is displayed on the document tab. The document tab also helps in switching between document windows when multiple images are opened in Photoshop.
-
The Toolbar
The toolbar holds all the Photoshop tools. It is located at the left side of the Photoshop interface. There are various tools in the toolbar; this includes tools for editing, painting, making selections, adding type to your document, retouching images, and others.
-
The Options Bar
The Options bar is directly connected to the Toolbar. This bar shows options for any tool selected in the Toolbar. The Option Bar can be found at the top of the interface, right above the document window.
-
The Panels
The panels are found at the right side of the Photoshop interface. They give users access to various options and commands, and there are various panels for various tasks. The Layers panel is a very important panel whereby users delete, add, and work with layers in the document.
-
Menu Bar
The Menu Bar is located at the top of the Photoshop interface. Various commands and options can be found in the Menu Bar, these commands and options are grouped into categories. For instance, the file menu consists of options for saving, closing, and opening documents.
-
The Search Bar
This is a new development in the Adobe Photoshop CC. The Search Bar allows users to locate tools and commands quickly. You can click on the search icon at the upper right of Photoshop to use the search feature. When you click the search icon, the Search Bar opens. You can enter your search item; for instance, you can enter “crop” and the search bar shows you the results.
-
The Toolbar’s Hidden tools
There are various tools in Photoshop, these tools are much more than what we see on the interface. You can see more hidden tools by clicking and holding on a tool’s icon.
-
Workspaces
Workspace in the Adobe Photoshop CC is the collection and arrangement of different interface elements. Workspaces help to control the Photoshop panels displayed on the screen, as well as arrange the panels. The Workspace option is represented by an icon in Photoshop CC.
Photo Edit Tools

Photo edit tools are tools used to apply some changes to the colors in an image. The editing tools in Adobe Photoshop CC include Sharpen, Burn, Dodge, Blur, Sponge, and Smudge. There are required steps to follow to use any of these tools. These tools are explained below:
-
Sharpen
The sharpen tool increases the sharpness of an image, to do this; you can increase the contrast of neighboring pixels. When this is done, this increases the clearness and contrast of borders.
-
Burn
This is a photo edit tool that affects the tone of an image. The burn tool darkens a part of an image.
-
Dodge
The doge tool helps to lighten any part of an image.
-
Blur
This tool helps to reduce the sharpness of an image. This is done by decreasing the color contrast of neighboring pixels.
-
Sponge
This tool has an effect on the contrast and saturation of an image.
-
Smudge
This tool helps to spread color in an image.
Important Advantages in Photoshop CC
The important Advantages in Adobe Photoshop Creative Cloud include:
- Advanced in-app learning
- Symmetry mode
- UI size preference
- Improvements in the home screen
- Improvements in the color wheel
- Access to Lightroom photos
- Improvements in usability
- Distribute spacing between objects
Mobile Design and Libraries
Adobe Photoshop Creative Cloud has done well in the area of mobile design. Users can make use of views and tools intended to enhance web and mobile design, and as well install the Adobe CC mobile app. The Design Space workspace works with HTML5, JavaScript, and CSS.
With Creative Cloud Libraries, users can have access to their assets from any device. It enables the major design assets for your projects or brand accessible to you. With the Creative Cloud Libraries, users can collect and organize colors, images, text styles, and other elements designed in different Creative Cloud desktop and mobile apps.
With Creative Cloud Libraries, users can collect design assets from different apps. Users can get some inspiration from the use of the family of Creative Cloud mobile apps. Design assets can also be organized into several Creative Cloud Libraries. These assets vary in terms of types of assets, brands, and projects. Artwork and designs can be created by utilizing the most recent assets from Creative Cloud Libraries. Creative Cloud Libraries allow users to work together with creative partners and as well make sure your designs are constant across projects.
Font Tricks
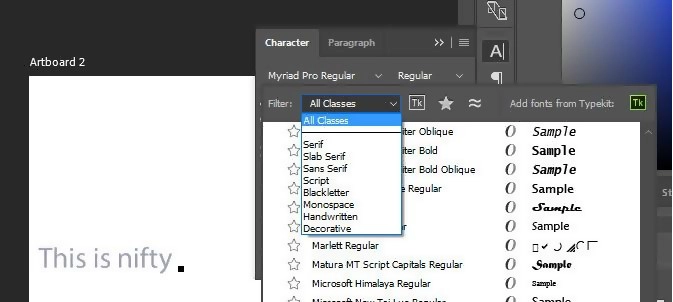
Adobe Photoshop Creative Cloud features desktop fonts for users. This can be done through Typekit. The Adobe Typekit is included in the Creative Cloud. The Typekit Portfolio plan consists of several fonts for both web and desktop. The good thing about these fonts is that users who do not pay for a Creative Cloud subscription can have access to a basic font collection.
Creative Cloud users can access hundreds of fonts. These fonts lack sync limits and web-only fonts, are easy to manage and browse, and are available for both desktop and web. Photoshop becomes more advanced with the inclusion of hundreds of fonts in Creative Cloud.
Creative Cloud allows users to search for fonts, and users can ask the program to show fonts similar to what they have selected. The Glyphs panel allows users to change alternate characters and shows you the alternates when a character in a Type layer is selected.
3D Tools and Fuse
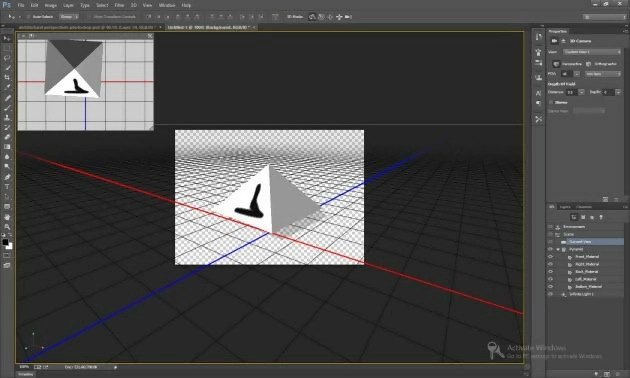
Photoshop has made real positive changes in its 3D tools; these improvements include faster performance and more realistic shadow rendering. Adobe Photoshop Creative Cloud provides all the 3D editing tools.
3D files comprise the following:
-
Meshes
Meshes give the basic structure of a 3D model. A mesh is described as an underlying structure developed from thousands of individual polygons. A 3D model has at least one mesh. Meshes can be viewed in various render modes and can be manipulated independently of each other. With the use of pre-supplied shapes, users can create their 3D meshes.
-
Lights
There are different types of lights; this includes Spot, Point lights, Infinite and also Image-based lights. Users can adjust and move the intensity and color of existing lights and as well add new lights to a 3D scene.
-
Materials
Materials control the appearance of meshes; a mesh can be associated with one or more materials. Different texture map types can be used by Photoshop material to define its general appearance.
3D tools include rotate, roll, drag, slide, scale, position presets:
-
Rotate
Rotate is the first tool on the list, click on the 3D model and rotate it around its X-axis by dragging up or down. You can also rotate it around its Y-axis. The rotation can be controlled by setting numeric values, and all of them are set to 0 by default.
-
Roll
You can drag side to side with the roll tool. The rotation can be controlled by setting numeric values on the orientation fields.
-
Drag
The Drag tool helps to move around the model in the 3D space. You can drag side to side to move in a horizontal direction, to move the model vertically, drag up or down. To move the model in the X/Z direction, you can hold the Alt key. The position can be controlled by setting numeric values on the position fields, by default, all values are set at 0.
-
Slide
With the slide tool, you can move the model horizontally by dragging side to side. Setting numerical values can help you put the position in check.
-
Scale
The Scale tool alters the size of the model. You can drag up or down to make the model larger or smaller. You can set the numeric values of the scales; the numeric values are set to 1 by default.
Editor's verdict
Adobe Photoshop Creative Cloud enables users to create beautiful images. This application has advanced type tools, organizational and syncing features, and integrated stock photography among others. This recent improvement in Photoshop has got new features that help workflow.